
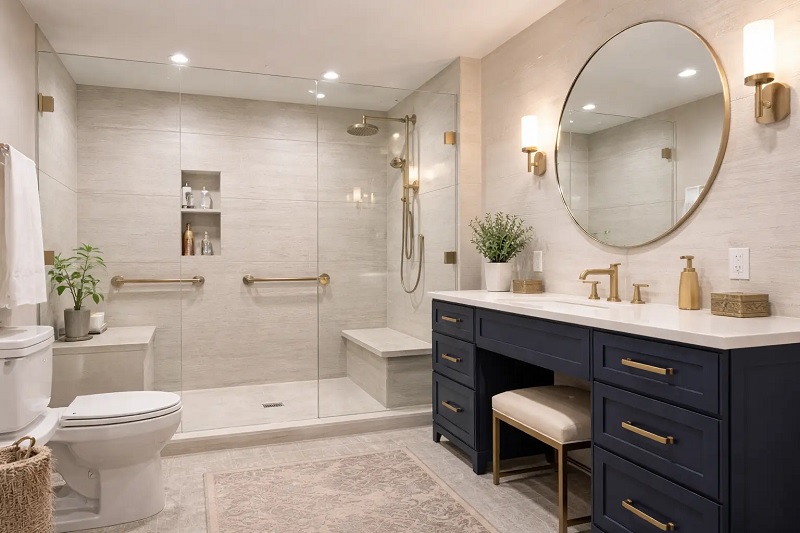
Remodeling a Bathroom for Aging in Place Without Looking Clinical

Mention an aging-in-place bathroom remodel to most homeowners, and the same uninviting picture immediately comes to mind: shiny stainless steel railings bolted awkwardly through tile, a wobbly white plastic stool sitting in the tub, and harsh overhead fluorescent light bouncing off sterile white walls. Understandably, plenty of people put off practical safety upgrades for years because they do not want their primary bathroom looking like a hospital recovery room—or hurting their home’s resale value.
That tradeoff is outdated. Today, the smartest aging-in-place design overlaps almost completely with high-end spa architecture. Features like zero-threshold showers, floating vanities, layered warm lighting, and wide doorways are already among the most sought-after luxury upgrades in American residential design. When you weave safety into the structure and finishes from the beginning, you end up with a calm, tailored bathroom that looks custom today and quietly supports your independence for decades.

Start Behind the Walls With Strategic Blocking

The single smartest investment in any bathroom remodel costs almost nothing and stays completely invisible once the tile goes up: solid wood wall blocking.
Before hanging cement board or drywall, have your contractor install 2-by-8 or 2-by-10 lumber framing horizontally between the wall studs around the shower, tub, and toilet—roughly between 32 and 38 inches off the finished floor. Take clear photos with a tape measure held against the open framing before closing the walls up.
Even if nobody in your household wants grab bars right now, hidden blocking ensures you can mount rock-solid support years later anywhere along those zones without tearing out expensive tile or relying on weak drywall anchors.
When you are ready to install support bars, skip institutional chrome tubes altogether. Plumbing manufacturers now produce weight-rated designer grab bars in matte black, brushed champagne bronze, satin brass, and brushed nickel that match modern faucets seamlessly. Better yet, dual-purpose fixtures disguise support directly inside everyday accessories:
  • Integrated towel bars and grab rails rated for 250 to 500 pounds that hold bath sheets neatly while providing reliable stability near the shower exit.

  • Corner shower shelves and shampoo niches engineered with discreet grip rims built right into the metal frame.

  • Reinforced toilet paper holders that offer a steady handhold next to the commode without calling attention to themselves.

Design a Spa-Worthy Curbless Shower

Stepping over a high bathtub wall or a four-inch tiled shower curb is one of the easiest ways to lose balance on wet tile. Replacing a standard tub-shower combo with a curbless, zero-threshold walk-in shower solves that hazard while immediately making the room feel larger and more modern.
To keep water contained without a raised dam, your contractor slopes the subfloor gently toward a sleek linear drain tucked along the back wall or entrance edge. Paired with a single frameless glass panel—or an open walk-in layout with generous floor space—the shower reads like a boutique hotel rather than a medical modification.

Build Comfort Directly Into the Tile Work

Skip folding plastic stools and build a floating cantilevered bench directly into the shower wall, topped with a single slab of quartz or matching porcelain. A built-in bench gives you a steady place to sit while washing or shaving, keeps the floor underneath open for easy cleaning, and looks intentionally architectural.

Rethink Shower Controls and Water Temperature

Think carefully about plumbing placement before the walls close. Mounting the shower valve on the entry wall—within arm’s reach from outside the wet zone—lets you turn on the water and let it warm up without stepping under a cold spray. Pair a fixed rain showerhead with a handheld wand mounted on a sturdy vertical slide bar so the height adjusts effortlessly whether you are standing or seated. Finally, install a thermostatic mixing valve with an anti-scald limit stop to keep water temperature steady even if someone flushes a toilet or starts the washing machine elsewhere in the house.

Choose Slip-Resistant Flooring That Feels Refined

Wet marble and glossy large-format porcelain tiles look glamorous in showroom lighting, yet they turn treacherous the second a drop of shampoo hits the floor. Fortunately, you do not have to settle for bumpy commercial rubber or dull utility tile to get reliable footing.
When shopping for porcelain or ceramic tile, ask specifically for the Dynamic Coefficient of Friction (DCOF) rating. For wet residential bathroom floors, look for matte or lightly honed tiles rated 0.42 or higher. Honed stone-look porcelain, textured wood-look planks, and subtle linen-finish tiles deliver rich visual texture with strong barefoot traction.
Inside the shower pan, smaller tiles—such as 2-by-2-inch squares, small hexagons, or tumbled mosaics—are a classic design trick that doubles as a safety feature. The additional grout lines create gentle mechanical grip underfoot without looking utilitarian. If the budget allows, laying electric radiant floor heating beneath the tile keeps bare feet warm on winter mornings and helps evaporate residual floor moisture faster after showers.

Upgrade Vanities, Hardware, and Toilets Quietly

Everyday contact points reveal whether a bathroom was truly designed for long-term ease. Swapping fussy hardware and cramped fixtures for cleaner modern profiles improves ergonomics for everyone in the home, from young kids to aging adults with stiff joints.
  • Floating vanities: Wall-mounted vanities look sleek and airy while creating clear toe space underneath. If a homeowner ever needs to sit on a vanity stool or use a wheelchair, a wall-hung cabinet—or a vanity with removable lower base panels—provides knee clearance without requiring a demolition project later.

  • Full-extension drawers: Replace deep lower cabinet doors with wide, soft-close drawers. Pulling supplies straight out at waist height eliminates kneeling, twisting, and digging into dark corners for extra towels or toiletries.

  • Single-lever faucets and cabinet pulls: Round twist knobs and small pinch-style cabinet knobs become surprisingly frustrating with arthritis or wet hands. Choose single-handle lever faucets that control flow and temperature with one easy nudge, paired with smooth D-shaped cabinet pulls and lever-style door handles.

  • Comfort-height toilets: Sitting roughly 17 to 19 inches from floor to seat—about two inches taller than traditional low toilets—comfort-height models look virtually identical to standard designs while reducing strain on knees and hips every single day. Having an electrician wire a GFCI outlet behind the toilet during the remodel also allows you to add a sleek bidet washlet seat easily whenever you want one.

Use Warm Layered Lighting and Subtle Visual Contrast

Eyes naturally require more light to see clearly as decades pass, and harsh shadows or bright glare make judging steps and wet surfaces harder. Moving away from a single blinding overhead ceiling fixture makes the entire bathroom both safer and dramatically more flattering.
Build your lighting in three thoughtful layers using warm 2700K to 3000K high-CRI LED fixtures:
  1. Ambient lighting: Damp-rated recessed ceiling lights spaced evenly across the room—including directly over the shower enclosure—to eliminate dark corners.

  2. Task lighting: Vertical wall sconces mounted on either side of the mirror at eye level, or a clean backlit LED mirror, to illuminate your face evenly without casting downward shadows.

  3. Nighttime pathway lighting: Soft, motion-activated LED strip lighting tucked beneath a floating vanity toe-kick. Stepping into the bathroom at two in the morning triggers a gentle floor-level glow so you can see the path clearly without shocking your eyes awake with full overhead brightness.

Pay attention to tonal contrast across surfaces as well. All-white-on-white bathrooms look crisp in magazines, yet white floors meeting white shower curbs, white toilets, and white countertops blur together when depth perception softens. Pairing a warm wood vanity with a pale quartz countertop, framing a white sink against a soft stone-toned counter, or choosing slightly deeper floor tiles against light walls creates crisp, natural boundaries that guide the eye effortlessly.

Open Up the Layout and Doorway

Before selecting a single tile sample, examine how easily a person can move through the room. Standard 24- or 28-inch interior bathroom doors feel tight even when you are carrying a laundry basket, and they become a real barrier if someone ever uses a walker or needs assistance after surgery.
Widening the entrance to a 36-inch doorway (or at least 32 inches of clear opening) immediately lends the room an open, custom feel. Rethink the door swing at the same time. Standard inward-swinging bathroom doors can accidentally trap someone if they slip and fall against the door from the inside. Switching to an outward-swinging door or installing a heavy-duty, soft-close pocket door frees up valuable interior square footage and removes that hazard cleanly.
Inside the room, keeping a generous clear floor zone in front of the vanity, shower, and toilet avoids cramped bottlenecks and creates the calm breathing room people associate with upscale primary suites.
Great aging-in-place remodeling never announces itself when you walk through the door. Instead, guests notice warm sconce lighting, natural wood textures, seamless tile work, and a spacious walk-in shower that feels effortless to use. By prioritizing smart framing, slip-resistant finishes, intuitive hardware, and open circulation now, you create a timeless retreat that adds genuine value to your home while keeping you comfortable and independent for every chapter ahead.

Comments are closed.